1.はじめ
レイアウトは、ユーザーインターフェースの構造を定義する成分です。つまりAndroidアプリケーションの画面のインターフェースを決定する成分です。
レイアウトは、Androidアプリで見られるように、ウィジェット(例:TextView、Button、またはEditText…)の配置をサポートします。
ウエブデザインの中に、ウエブサイトのインタフェースを構築する際には、一番重要さを感じる最初のステップは
ウエブデザインの中に、ウエブサイトのインタフェースを構築する際には、一番重曹さを感じる最初のステップはサイトのレイアウトを作成することです。
Androidでも、Androidが提供するレイアウトと、ビューのレイアウトを含めて配置し、Androidアプリケーションのインターフェイスを作成する必要があります。
2.なぜレイアウの作成が重要ですか?
- Webアプリケーション、デスクトップアプリケーションなどの他のアプリケーションと同様に、レイアウトはユーザーと直接対応するコンポーネントです。
- 優れたレイアウトのアプリケーションは、ユーザーのエクスペリエンスを向上させます。
- 適切に整理されたレイアウトは、アプリケーションのパフォーマンスの向上にもなります。
さらに、モバイルアプリケーションは、さまざまなサイズのさまざまなデバイスで適切に表示されるという問題も解決する必要があります。 したがって、レイアウト設計に関する十分な知識と経験があれば、アプリケーションでレイアウトの破損に問題は発生しません。
3.Androidのレイアウトの種類
Androidは、RelativeLayout、LinearLayout、GridLayout、TableLayout、FrameLayout、ConstraintLayoutの6つのレイアウトがあります。
3.1 FrameLayout
フレームレイアウトは最も基本的なレイアウトです。このレイアウトにビューを添付すると、これらのビューは常に画面の左隅に保持され、位置を変更できなく、このビューにトランスペアレントを設定しないと、後のビューが上書きされます。
<FrameLayout xmlns:android="http://schemas.android.com/apk/res/android"
xmlns:tools="http://schemas.android.com/tools"
android:layout_width="match_parent"
android:layout_height="match_parent"
tools:context=".MainActivity" >
<TextView>
android:id="@+id/textView2"
android:layout_width="218dp"
android:layout_height="221dp"
android:background="@color/colorPrimaryDark" />
</FrameLayout>
3.2 Linear Layout
LinearLayoutは、その単純さから、おそらく最も一般的に使用されるレイアウトタイプです。 LinearLayoutは、ビューをブロック形式で配置し、上書きしません。LinearLayout の 双方向のレイアウトは次のとおりです。
- VerticalOrientation:ビューは垂直に配置されます。
- Horizontal Orientation : 水平方向です。
例:LinearLayout水平です。
code: <LinearLayout'>
xmlns:android1="http://schemas.android.com/apk/res/android"
android1:layout_width="match_parent" layout_height=<"match_parent" >
<TextView
android1:layout_width="80dp"_android1:layout_height="80dp"
android1:text="1"
android1:textColor="#fff"
android1:textSize="15pt"
android1:textAlignment="center"
android1:textStyle="bold"
android1:background="@color/colorAccent" />
<TextView
android1:layout_width="80dp"
android1:layout_height="80dp"
android1:text="1"
android1:textColor="#fff"
android1:textSize="15pt"
android1:textAlignment="center"
android1:textStyle="bold"
android1:background="@color/colorPrimary" />
<TextView
android1:layout_width="80dp"
android1:layout_height="80dp"
android1:text="3"
android1:textColor="#fff"
android1:textSize="15pt"
android1:textAlignment="center"
android1:textStyle="bold"
android1:background="#8c0520" />
<TextView
android1:layout_width="80dp"
android1:layout_height="80dp"
android1:background="#efcd21"
android1:text="4"
android1:textAlignment="center"
android1:textColor="#fff"
android1:textSize="15pt"
android1:textStyle="bold" />
</LinearLayout>
3.4 Realistic Layout
RealisticLayoutは、IDを介して各ビューの位置が他のサブビュー、又はその主成分に対して確定されるレイアウトのタイプです。
RelativeLayout xmlns:android="http://schemas.android.com/apk/res/android"
android:layout_width="match_parent"
android:layout_height="match_parent">
<TextView
android:layout_width="150dp"
android:layout_height="50dp"
android:text="1"
android:textColor="#fff"
android:id="@+id/hop1"
android:textSize="10pt"
android:textAlignment="center"
android:background="@color/colorAccent" />
<TextView
android:layout_width="150dp"
android:layout_height="50dp"
android:text="2"
android:textColor="#fff"
android:id="@+id/hop2"
android:textSize="10pt"
android:textAlignment="center"
android:layout_toRightOf="@+id/hop1"
android:background="@color/colorPrimary" />
<TextView
android:layout_width="150dp"
android:layout_height="50dp"
android:text="3"
android:textColor="#fff"
android:id="@+id/hop3"
android:background="#8e0917"
android:textSize="10pt"
android:textAlignment="center"
android:layout_below="@+id/hop1" />
<TextView
android:layout_width="150dp"
android:layout_height="50dp"
android:text="4"
android:textColor="#fff"
android:id="@+id/hop4"
android:textSize="10pt"
android:textAlignment="center"
android:background="#edcb25"
android:layout_below="@+id/hop2"
android:layout_toRightOf="@+id/hop3" />
</RelativeLayout>
3.5 TableLayout
TableLayoutは内部のサブビューを表形式に配置します。各行は、サブビューを含むTableRow内のTableRowビューオブジェクトであり、これらの各サブビューはセルにあります。列/行はゼロから始まります。最初に、TableLayoutとTableRowを使用してレイアウトを練習しましょう。
TableLayout android:layout_height="match_parent"
android:layout_width="match_parent"
xmlns:android="http://schemas.android.com/apk/res/android">
<TableRow>
<TextView
android:text="TableLayout Example"
android:background="#c98282"
android:gravity="center"/>
</TableRow>
<TableRow>
<Button android:text="B1 B1" />
<Button android:text="B2"/>
</TableRow>
<TableRow>
<Button android:text="C1" />
<Button android:text="C2" />
<Button android:text="Cell example" />
</TableRow>
</TableLayout>
3.6 GridLayout
AndroidのGridLayoutはグリッドレイアウトであり、そのグリッドの列と行を分割できます。各ビューはこのグリッドのセルに配置されます。
GridLayout
xmlns:android1="http://schemas.android.com/apk/res/android"
android1:layout_width="match_parent"
android1:layout_height="match_parent"
android1:columnCount="2"
android1:rowCount="2">
<TextView
android1:layout_width="80dp"
android1:layout_height="80dp"
android1:text="1"
android1:textColor="#fff"
android1:textSize="15pt"
android1:textAlignment="center"
android1:textStyle="bold"
android1:background="@color/colorAccent" />
<TextView
android1:layout_width="80dp"
android1:layout_height="80dp"
android1:text="2"
android1:textColor="#fff"
android1:textSize="15pt"
android1:textAlignment="center"
android1:textStyle="bold"
android1:background="@color/colorPrimary" />
<TextView
android1:layout_width="80dp"
android1:layout_height="80dp"
android1:text="3"
android1:textColor="#fff"
android1:textSize="15pt"
android1:textAlignment="center"
android1:textStyle="bold"
android1:background="#8c0520" />
<TextView
android1:layout_width="80dp"
android1:layout_height="80dp"
android1:background="#efcd21"
android1:text="4"
android1:textAlignment="center"
android1:textColor="#fff"
android1:textSize="15pt"
android1:textStyle="bold" />
</GridLayout>
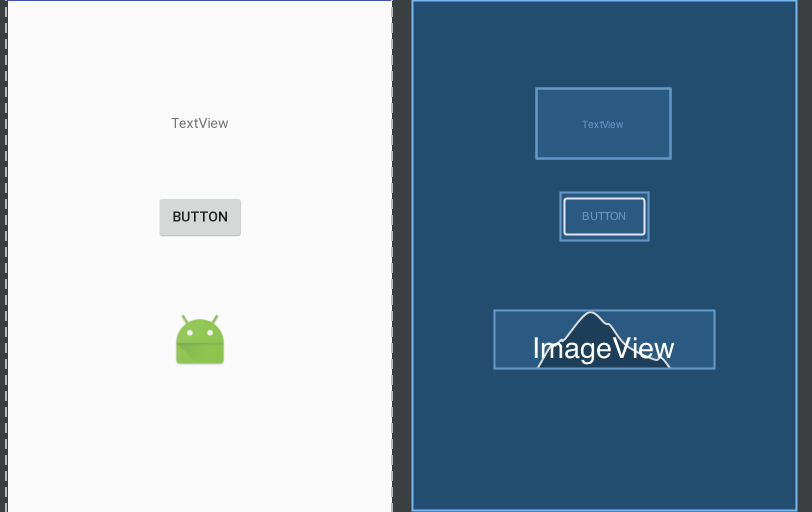
これは、ビューが他のビューに対して相対的に配置されるレイアウトです。
これはGoogleが発表したばかりのレイアウトであり、AndroidStudioのデザインツールで完全に使用できるように設計されています。
<?xml version="1.0" encoding="utf-8"?>
<android.support.constraint.ConstraintLayout xmlns:android="http://schemas.android.com/apk/res/android"
xmlns:app="http://schemas.android.com/apk/res-auto"
xmlns:tools="http://schemas.android.com/tools"
android:layout_width="match_parent"
android:layout_height="match_parent"
tools:context=".MainActivity">
<TextView
android:id="@+id/textView"
android:layout_width="wrap_content"
android:layout_height="wrap_content"
android:text="Hello World!"
app:layout_constraintBottom_toBottomOf="parent"
app:layout_constraintLeft_toLeftOf="parent"
app:layout_constraintRight_toRightOf="parent"
app:layout_constraintTop_toTopOf="parent" />
<Button
android:id="@+id/button"
android:layout_width="wrap_content"
android:layout_height="wrap_content"
android:text="constrainLayout"
app:layout_constraintBottom_toBottomOf="parent"
app:layout_constraintEnd_toEndOf="parent"
app:layout_constraintStart_toStartOf="parent"
app:layout_constraintTop_toBottomOf="@+id/textView"/>
</android.support.constraint.ConstraintLayout>
4. Android向けのモバイルアプリケーション開発サービス

- モバイル開発 , アプリ開発
お客様の業務内容を理解する上で、企画・発案~設計・開発~運用・マーケット申請・保守・管理といった一連のアプリ開発を提供いたします。
- スマホアプリ開発における強み
iOS、Androidのネーティブ アプリ開発からReactNativeやIonic、Cordovaなどのハイブリッドアプリ開発までの長年経験を活かして、お客様のニーズに最も適した手段を選択し、快適な動作と保守管理性の高い理想的な業務アプリケーションを実現いたします。お客様の業務内容を理解する上で、企画・発案~設計・開発~運用・マーケット申請・保守・管理といった一連のアプリ開発を提供いたします。
4.1開発技術
- Android
- IOS
- Cross Platform: Xamarin, Titanium, Phonegap, Meteor.
- Unity
- Cocos2dx,…
- Maps, GPS, sensor, socket,…
4.2 開発したアプリケーション
- ヘルスケア
- 採用・募集
- モバイルゲーム2D , 3D
- 企業内のアプリケーション
- 旅行
4.3 Hachinetのサービス流れ
①NDA契約書の締結
お客様のご注文時に、情報の把握を深めていただくようアドバイスいたします。 これは、ソフトウェア会社がアウトソーシングプロジェクトを受け入れることができるかどうかを決定する基本的な段階です。
②双方の情報交換
顧客をよく調査し、説得力のある注文を行うために顧客の情報と要件を把握します。
③ヒアリング仕組書の分析:顧客要件を把握した後、会社のチームは要件分析と計画を実施します。
④見積書と提案書の送付:プロジェクト計画の概要を説明し、詳細な見積もりを顧客に送付します。
⑤納品や業務レビュー:顧客が承認した場合は、注文の会社に引き渡します。 これは、プロジェクトがほぼ完了して成功していることも証明します。
⑥業務開始:プロジェクトを開始します。
⑦契約締結:顧客との契約に締結します。
⑧チーム開発者の面接
サービスに関するご相談やご質問など、こちらからお問い合わせください。
当社では専門的にのITオフショア開発などを行っております。
当社の提供サービスは以下となります。
① ウエブアプリケーション(.NET , JAVA, PHP,..)
③モバイルアプリケーション: IOS (Swift, Object C), Android (Kotlin, Android)
④ システムアプリケーション (Cobol , ERP ...)
⑤ DXソリューション
⑥ 新技術 (Blockchain ...)
5. まとめ
ベトナムでオフショア開発パートナーをお探しの場合は、ハチネットは完全新いの特徴を体験できるパートナーです。
ハチネットでは完全な企業メカニズムシステム、多様な開発言語、IT人材紹介に関する全国のHR フリーランサネットワーク接続する採用プラットフォームであるDEVWORKシステムは豊富な人材を採用、ベトナムのオフショア開発におけるトップ10企業の1つです。
現在、ハチネットのパートナーの80%は日本のソフトウェア企業であり、当社のエンジニアは、高い技術を持つだけでなく、お客様と日本語で直接にコミュニケーションをとることができます。書類面でも100%日本語をドキュメントの処理ができます。
弊社のサービスにご興味がございましたら、こちらのメールアドレスにご連絡お願いします。ご連絡をお待ちしております。
オフショア開発をご検討されている方々はぜひ一度ご相談ください。
※以下通り弊社の連絡先
アカウントマネージャー: クアン(日本語・英語対応可)
電話番号: (+84)2462 900 388
お電話でのご相談/お申し込み等、お気軽にご連絡くださいませ。